在绘制子控件之前,为其添加矩阵变换的小部件。
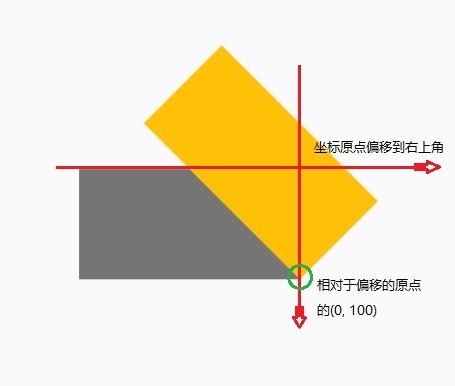
但需要注意的是,矩阵变换不像 RotatedBox(在布局前进行变换),而是在绘制前进行变换,也就是说子控件虽然进行了变换,但是其布局无变化,意味着子控件的位置和大小都没有随着进行变化。
1 2 3 4 5 6 7 8
| const Transform({ Key key, @required this.transform, this.origin, this.alignment, this.transformHitTests = true, Widget child, })
|
transform:变换的过程中的矩阵 Matrix4
origin:子组件作变换的原点,是以左上角的为坐标原点设置的点
alignment:子组件原点的对齐方式,也就是改变坐标的原点的位置
transformHitTests:点击区域时是否变换
代码示例
1 2 3 4 5 6 7 8 9 10 11 12 13 14 15 16 17 18 19 20 21
| Scaffold( appBar: AppBar( title: Text("Transform Demo Page"), ), body: Center( child: Container( width: 200, height: 100, color: Colors.grey.shade600, child: Transform( origin: Offset(0, 100), alignment: Alignment.topRight, transform: Matrix4.rotationZ(0.785), child: Container( color: Colors.amber, ), ), ), ), );
|

Transform 有多个不同的命名构造函数,分别对应这不同的变换效果:
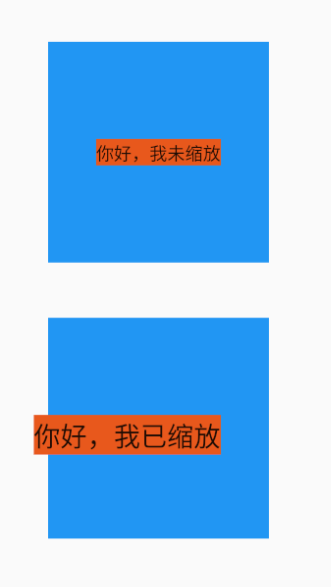
1 2 3 4 5 6 7 8 9
| Transform.scale({ Key key, @required double scale, this.origin, this.alignment = Alignment.center, this.transformHitTests = true, Widget child, }) : transform = Matrix4.diagonal3Values(scale, scale, 1.0), super(key: key, child: child);
|
从上述代码中可看出,需要注意:
- 缩放是通过传入缩放比例到
Matrix4.diagonal3Values(scale, scale, 1.0),只是缩放 x 轴和 y 轴,z 轴无变化,当然 z 轴的变化也无从感知;
- 原点的对齐方式是默认居中的,也就是放大后的组件,是与原组件是同中心的。
示例代码
1 2 3 4 5 6 7 8 9 10 11 12 13 14 15 16 17 18 19 20 21 22 23 24 25 26 27 28 29 30 31 32 33 34 35 36 37 38 39 40 41
| Scaffold( appBar: AppBar( backgroundColor: Colors.pink.shade400, title: Text("Transform Demo Page"), ), body: Center( child: Column( mainAxisAlignment: MainAxisAlignment.center, children: [ Container( alignment: Alignment.center, width: 200, height:200, color: Colors.blue, child: Container( color: const Color(0xFFE8581C), child: const Text('你好,我未缩放'), ), ), SizedBox.fromSize(size: Size(double.infinity,50),), Container( alignment: Alignment.center, width: 200, height: 200, color: Colors.blue, child: Transform.scale( origin: Offset(0,0), alignment: Alignment.topRight, scale: 1.5, child: Container( color: const Color(0xFFE8581C), child: const Text('你好,我已缩放'), ), ), ),
],
), ), )
|

1 2 3 4 5 6 7 8 9
| Transform.rotate({ Key key, @required double angle, this.origin, this.alignment = Alignment.center, this.transformHitTests = true, Widget child, }) : transform = Matrix4.rotationZ(angle), super(key: key, child: child);
|
1 2 3 4 5 6 7 8 9
| Transform.translate({ Key key, @required Offset offset, this.transformHitTests = true, Widget child, }) : transform = Matrix4.translationValues(offset.dx, offset.dy, 0.0), origin = null, alignment = null, super(key: key, child: child);
|
skew 斜切
斜切是个例外,Transform 类中没有给出封装的构造函数,只能用 Matrix4 传入 transform实现,以下是是个大小相同的 Container 的各式斜切:
示例代码
1 2 3 4 5 6 7 8 9 10 11 12 13 14 15 16 17 18 19 20 21 22 23 24 25 26 27 28 29 30 31 32 33 34 35 36 37
| Scaffold( appBar: AppBar( backgroundColor: Colors.pink.shade400, title: Text("Transform Demo Page"), ), body: Center( child: Column( mainAxisAlignment: MainAxisAlignment.spaceBetween, children: [ Center( child: Transform( transform: Matrix4.skewY(pi / 4), alignment: Alignment.topLeft, child: Container( width: 120.0, height: 80.0, color: Colors.brown))), Center( child: Transform( transform: Matrix4.skewX(pi / 4), alignment: Alignment.topLeft, child: Container( width: 120.0, height: 80.0, color: Colors.redAccent))), Center( child: Transform( transform: Matrix4.skew(pi / 6, pi / 6), alignment: Alignment.topLeft, child: Container( width: 120.0, height: 80.0, color: Colors.amber))), Center( child: Transform( transform: Matrix4.skew(0.0, 0.0), alignment: Alignment.topLeft, child: Container( width: 120.0, height: 80.0, color: Colors.blue))), ], ), ), )
|